lunes, 13 de abril de 2020

How To Protect Your Private Data From Android Apps

protect-private-data-from-apps
In android there is lots of personal data that can be accessed by any unauthorized apps that were installed on the device. This is just because your Android data is openly saved in your file explorer that is not encrypted or protected by encryption method, so, even normal app can also hijack your data very easily as the media access permissions are granted when you click on accept button while installing the apps. And this may be endangering the private data that you might not want to share with anyone. So here we have a cool way that will help you to make your data private by disallowing the apps to access your media files without your permission. So have a look on complete guide discussed below to proceed.

How To Protect Your Private Data From Android Apps

The method is quite simple and just need a rooted android device that will allow the Xposed installer to run on the device. And after having the Xposed installer you will be using an Xposed module to disallow the apps to have access to your personal or say private data. For this follow the guide below.

Steps To Protect Your Private Data From Android Apps:

Step 1. First of all, you need a rooted android as Xposed installer can only be installed on a rooted android, so Root your android to proceed for having superuser access on your android.
Step 2. After rooting your Android device you have to install the Xposed installer on your android and thats quite lengthy process and for that, you can proceed with our Guide to Install Xposed Installer On Android.Xposed Installer
Step 3. Now after having an Xposed framework on your Android the only thing you need is the Xposed module that is DonkeyGuard – Security Management the app that will allow you to manage the media access for apps installed on your device.
Step 4. Now install the app on your device and after that, you need to activate the module in the Xposed installer. Now you need to reboot your device to make the module work perfectly on your device.
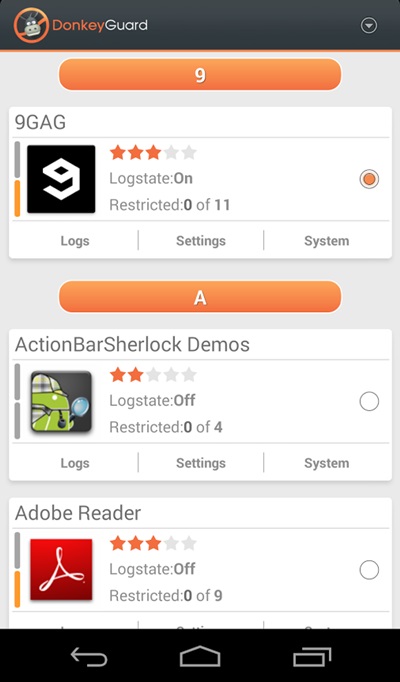
Step 5. Now launch the app and you will see all the apps that are currently installed on your device.
privacy 1
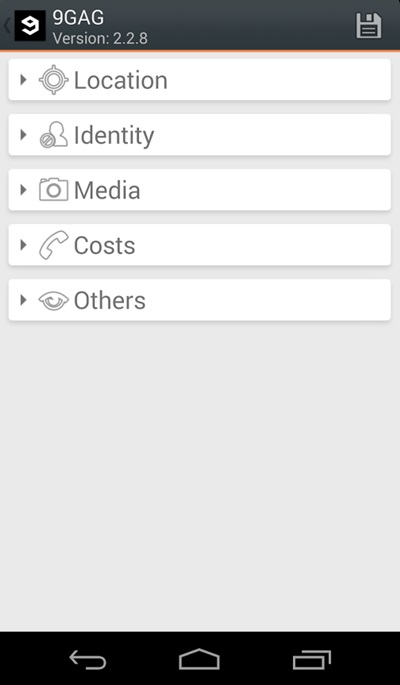
Step 6. Now edit the media permission for the apps that you don't want to have access to your media with private data.privacy 2
That's it, you are done! now the app will disallow the media access to that apps.

Manually Checking App Permission

Well, our Android operating system offers a nice feature in which we can manage a single app's permission. However, you need to have Android 6.0 Marshmallow or a newer version to get the option.
Step 1. First of all, open Settings and then tap on 'Apps'.
Manually Checking App Permission
Step 2. Now you will see the list of apps that are currently installed on your Android smartphone. Now you need to select the app, and then you will see 'Permissions.'
Manually Checking App Permission
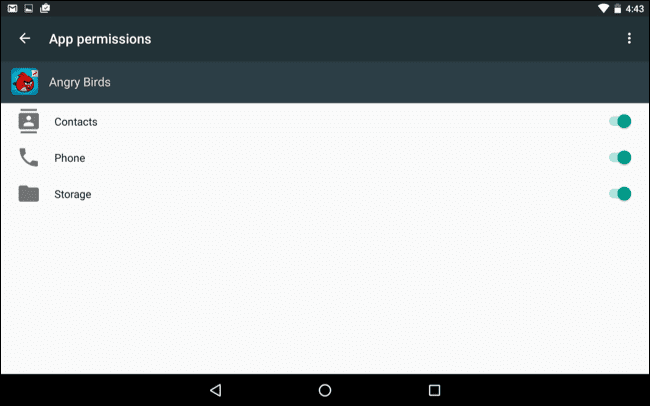
Step 3. Now it will open a new window, which will show you all permissions that you have granted to the app like Camera access, contacts, Location, microphone, etc. You can revoke any permissions as per your wish.
Manually Checking App Permission
Well, the same thing you need to perform if you feel that you have installed some suspicious app on your Android. By this way, you can protect your private data from Android apps.
Related news
  1. Hacker Tools For Mac
  2. Hacking Tools For Windows
  3. Hack Rom Tools
  4. Pentest Tools Alternative
  5. Computer Hacker
  6. Hacking Tools Kit
  7. Growth Hacker Tools
  8. Hacking Tools Software
  9. New Hacker Tools
  10. Hack App
  11. Hack Tools Pc
  12. Pentest Tools For Ubuntu
  13. Hack Apps
  14. Hacker Search Tools
  15. Hack Tools For Ubuntu
  16. Hacking Apps
  17. New Hack Tools
  18. Tools Used For Hacking
  19. Hacking Apps
  20. Ethical Hacker Tools
  21. Hacking Tools 2019
  22. Black Hat Hacker Tools

KillShot: A PenTesting Framework, Information Gathering Tool And Website Vulnerabilities Scanner


Why should i use KillShot?
   You can use this tool to Spider your website and get important information and gather information automaticaly using whatweb-host-traceroute-dig-fierce-wafw00f or to Identify the cms and to find the vulnerability in your website using Cms Exploit Scanner && WebApp Vul Scanner Also You can use killshot to Scan automaticly multiple type of scan with nmap and unicorn . And With this tool You can Generate PHP Simple Backdoors upload it manual and connect to the target using killshot

   This Tool Bearing A simple Ruby Fuzzer Tested on VULSERV.exe and Linux Log clear script To change the content of login paths Spider can help you to find parametre of the site and scan XSS and SQL.

Use Shodan By targ option
   CreateAccount Here Register and get Your aip Shodan AIP And Add your shodan AIP to aip.txt < only your aip should be show in the aip.txt > Use targ To search about Vulnrable Targets in shodan databases.

   Use targ To scan Ip of servers fast with Shodan.

KillShot's Installation
   For Linux users, open your Terminal and enter these commands:   If you're a Windows user, follow these steps:
  • First, you must download and run Ruby-lang setup file from RubyInstaller.org, choose Add Ruby executables to your PATH and Use UTF-8 as default external encoding.
  • Then, download and install curl (32-bit or 64-bit) from Curl.haxx.se/windows. After that, go to Nmap.org/download.html to download and install the lastest Nmap version.
  • Download killshot-master.zip and unzip it.
  • Open CMD or PowerShell window at the KillShot folder you've just unzipped and enter these commands:
    ruby setup.rb
    ruby killshot.rb

KillShot usage examples
   Easy and fast use of KillShot:

   Use KillShot to detect and scan CMS vulnerabilities (Joomla and WordPress) and scan for XSS and SQL:


References: Vulnrabilities are taken from
Related word
  1. Usb Pentest Tools
  2. Hacking Tools Mac
  3. Kik Hack Tools
  4. Hack Tool Apk No Root
  5. Hack Apps
  6. Hacker Tools For Mac
  7. Hacker Hardware Tools
  8. Hacking Tools Online
  9. Hacking Tools Kit
  10. New Hack Tools
  11. Hack Apps
  12. Hacking Tools For Beginners
  13. Hacker Tools Apk Download
  14. Ethical Hacker Tools
  15. Pentest Tools Apk

Security Onion - Linux Distro For IDS, NSM, And Log Management


Security Onion is a free and open source Linux distribution for intrusion detection, enterprise security monitoring, and log management. It includes Elasticsearch, Logstash, Kibana, Snort, Suricata, Bro, OSSEC, Sguil, Squert, NetworkMiner, and many other security tools. The easy-to-use Setup wizard allows you to build an army of distributed sensors for your enterprise in minutes!

Security-onion project
This repo contains the ISO image, Wiki, and Roadmap for Security Onion.

Looking for documentation?
Please proceed to the Wiki.

Screenshots


More information

LEGALITY OF ETHICAL HACKING

Why ethical hacking?
Legality of Ehical Hacking
 
Ethical hacking is legal if the hacker abides by the rules stipulated in above section on the definition of ethical hacking.

Ethical hacking is not legal for black hat hackers.They gain unauthorized access over a computer system or networks for money extortion.
More info

CloudFrunt - A Tool For Identifying Misconfigured CloudFront Domains


CloudFrunt is a tool for identifying misconfigured CloudFront domains.

Background
CloudFront is a Content Delivery Network (CDN) provided by Amazon Web Services (AWS). CloudFront users create "distributions" that serve content from specific sources (an S3 bucket, for example).
Each CloudFront distribution has a unique endpoint for users to point their DNS records to (ex. d111111abcdef8.cloudfront.net). All of the domains using a specific distribution need to be listed in the "Alternate Domain Names (CNAMEs)" field in the options for that distribution.
When a CloudFront endpoint receives a request, it does NOT automatically serve content from the corresponding distribution. Instead, CloudFront uses the HOST header of the request to determine which distribution to use. This means two things:

  1. If the HOST header does not match an entry in the "Alternate Domain Names (CNAMEs)" field of the intended distribution, the request will fail.
  2. Any other distribution that contains the specific domain in the HOST header will receive the request and respond to it normally.
This is what allows the domains to be hijacked. There are many cases where a CloudFront user fails to list all the necessary domains that might be received in the HOST header. For example:
  • The domain "test.disloops.com" is a CNAME record that points to "disloops.com".
  • The "disloops.com" domain is set up to use a CloudFront distribution.
  • Because "test.disloops.com" was not added to the "Alternate Domain Names (CNAMEs)" field for the distribution, requests to "test.disloops.com" will fail.
  • Another user can create a CloudFront distribution and add "test.disloops.com" to the "Alternate Domain Names (CNAMEs)" field to hijack the domain.
This means that the unique endpoint that CloudFront binds to a single distribution is effectively meaningless. A request to one specific CloudFront subdomain is not limited to the distribution it is associated with.

Installation
$ pip install boto3
$ pip install netaddr
$ pip install dnspython
$ git clone https://github.com/disloops/cloudfrunt.git
$ cd cloudfrunt
$ git clone https://github.com/darkoperator/dnsrecon.git
CloudFrunt expects the dnsrecon script to be cloned into a subdirectory called dnsrecon.

Usage
cloudfrunt.py [-h] [-l TARGET_FILE] [-d DOMAINS] [-o ORIGIN] [-i ORIGIN_ID] [-s] [-N]

-h, --help Show this message and exit
-s, --save Save the results to results.txt
-N, --no-dns Do not use dnsrecon to expand scope
-l, --target-file TARGET_FILE File containing a list of domains (one per line)
-d, --domains DOMAINS Comma-separated list of domains to scan
-o, --origin ORIGIN Add vulnerable domains to new distributions with this origin
-i, --origin-id ORIGIN_ID The origin ID to use with new distributions

Example
$ python cloudfrunt.py -o cloudfrunt.com.s3-website-us-east-1.amazonaws.com -i S3-cloudfrunt -l list.txt

CloudFrunt v1.0.3

[+] Enumerating DNS entries for google.com
[-] No issues found for google.com

[+] Enumerating DNS entries for disloops.com
[+] Found CloudFront domain --> cdn.disloops.com
[+] Found CloudFront domain --> test.disloops.com
[-] Potentially misconfigured CloudFront domains:
[#] --> test.disloops.com
[+] Created new CloudFront distribution EXBC12DE3F45G
[+] Added test.disloops.com to CloudFront distribution EXBC12DE3F45G


Related news


Hacking Windows: Tricks Para Saltarse AppLocker

AppLocker es una funcionalidad que apareció con Windows 7 (versión Enterprise y Ultimate) y Windows Server 2008 R2 para sustituir a las Políticas de Restricción de Software - conocidas como SRP "Software Restriction Policies" - de las versiones anteriores. Igual que las directivas de restricción de software, AppLocker permite definir las aplicaciones autorizadas para ser ejecutadas por sus usuarios estándar dentro de su dominio instalando sus parámetros mediante directivas de grupo.

Figura 1: Hacking Windows: Tricks para saltarse AppLocker

La utilidad principal de esta funcionalidad es limitar la instalación de malware e impedir la instalación de software no normalizado y, por supuesto, son pieza fundamental de la Seguridad en Windows Server 2016 y de la aplicación de procesos de fortificación para conseguir la Máxima Seguridad en Windows.

Figura 2: Windows Server 2016: Configuración, Adminisración y Seguridad
de Ángel Núñez (Puedes contactar con él en MyPublicInbox)

Con la aparición de AppLocker, el número de cosas que se pueden realizar a la hora de evitar la ejecución de determinado tipo de programas son muchas. Ente la lista se encuentran:
- Definir reglas basadas en atributos de archivo que se mantengan a lo largo de las actualizaciones de la aplicación (nombre del archivo, versión…) , reglas basadas en la ruta y el hash del archivo. 
- Asignar una regla a un grupo de seguridad o a un usuario individual. 
- Crear Excepciones a ciertas reglas. 
- Modo auditoría para implementar la directiva y ver el impacto que tendrá antes de aplicarla. 
- Simplificar la creación y la administración de reglas de AppLocker con PowerShell.
Las tecnologías de control de acceso, como Active Directory Rights Management Services (ADRMS) y las listas de control de acceso (ACL), ayudan a controlar los usuarios a los que se permite el acceso al bien más preciado de las organizaciones: la información que posee. Al crear una lista de aplicaciones y archivos aprobados y permitidos, AppLocker también se ayuda a impedir la ejecución de aplicaciones para determinados usuarios.

Figura 3: Máxima Seguridad en Windows Gold Edition de
Sergio de los Santos (Puedes contactar con él en MyPublicInbox)

Como AppLocker puede controlar archivos .dll, también es útil para controlar quién puede instalar y ejecutar controles ActiveX y es ideal para aquellas organizaciones que actualmente usan la directiva de grupo para administrar sus equipos.

Hacking Windows: Bypass de AppLocker

Antes de empezar con la prueba de concepto es necesario activar el servicio de identidad de aplicación, así una vez que configuremos las reglas en AppLocker pueda aplicar las reglas que añadamos posteriormente. Para ello abrimos una CMD con permisos de administrador y escribimos el siguiente comando:

Figura 4: Activando el servicio de identidad de aplicacion

Una vez nos muestre que ha sido activado con éxito es necesario reiniciar el sistema operativo, para que se apliquen correctamente los cambios de esta activación. Después, ya podemos proceder a abrir las directivas de seguridad local, que se encuentra dentro de Panel de control\Sistema y  ahí dentro de Seguridad\Herramientas administrativas. Una vez abierta se nos mostrará una ventana como está de la imagen siguiente.

Figura 5: AppLocker

Para comenzar a configurar el servicio, debemos pulsar en el botón verde que dice "Configure rule enforcement" para configurar la aplicación de reglas. En el cuadro de configuración vamos a habilitar reglas de ejecutables tal y como se puede ver a continuación.

Figura 6: La primera opción es "Executable Rules"

Ahora procedemos a crear la regla para limitar la ejecución de una determinada aplicación, en nuestro caso vamos a bloquear a nuestra más que conocida, y muy querida, FOCA - Fear the FOCA! Se puede configurar de diferentes maneras, ya sea por la ruta de una carpeta o fichero, editor de software (el que firma el binario) o bien por el hash de archivo.

Figura 7: Configurando regla de ejecutable por ruta

Prueba 1: Saltando la regla de ruta

Nosotros vamos a elegir la ruta del ejecutable, para ver de manera sencilla cómo funciona AppLocker y después verificamos que se ha creado la regla para FOCA.

Figura 8: Reglas de prohibir FOCA por ruta creada

Como somos muy fan del Pentesting con Powershell, también se os enseñamos cómo se pueden visualizar las reglas que hay creadas en el Windows en el que estás trabajando con un pequeño script , tal y como podéis ver en la siguiente imagen.

Figura 9: Script en PowerShell (Haz clic para ver en grande)

Tras ejecutarlo, el resultado que nos arroja dicho script es lo siguiente. Es decir, la misma información pero directamente en nuestra PowerShell.

Figura 10: Reglas creadas en AppLocker

Y ahora sí, para ver si la configuración que hemos hecho funciona, lo que debería suceder cuando  intentamos ejecutar el binario de FOCA es que se nos mostrara el siguiente mensaje, dejándonos claro que no es posible hacer uso de esta aplicación.

Figura 11: AppLocker prohibe la ejecución de ese archivo

Saltar esta primera protección es bastante sencillo y conocido. Al final, como sabemos por la regla que hemos visto cuando hemos ejecutado nuestro script PowerShell, esta aplicación está bloqueada por ruta, es decir, que si tenemos permisos de lectura del binario de la FOCA - o de toda la carpeta - y escritura en una carpeta del sistema, podemos hacer lo siguiente:

Figura 12: Copiamos la carpeta de la FOCA a otra ubicación

Si la fortificación del sistema no se ha hecho acompañándolo de una estricta ACL, podremos copiar la carpeta de Origen (FocaPro_locked) a una nueva ubicación (FocaPro_unlocked), invalidando completamente la regla de AppLocker que está configurada.

Figura 13: Carpetas copiadas. Una afectada por AppLocker y otra no.

Ahora ya, si intentamos ejecutar el nuevo binario de FOCA, no encontraremos ninguna regla en AppLocker que le afecte, así que podemos disfrutar de

Figura 14: FOCA Final

No es nada sorprendente que esto pase de esta forma. Esta regla hace lo que dice, que es evitar que un programa que esté en una ruta concreta no se ejecute y si no lo acompañas de otras medidas de fortificación la regla sirve para lo que sirve. Por eso hay más medidas en AppLocker.

Prueba 2: Saltando la regla de Hash

Ahora que ya entendemos algo mejor AppLocker, vamos a ver otro ejemplo de bypass, pero esta vez vamos a saltarnos la regla del Hash de un fichero, que al igual que la regla anterior tiene sus limitaciones. Trabajaremos en este caso con Process Explorer (procexp64.exe), la herramienta de Sysinternals para ver los procesos en Windows. Primero obtenemos el Hash del fichero :

Figura 15: Obteniendo el Hash de un fichero con PowerShell

Como habéis visto, esto es algo que también podemos hacer con PowerShell. Y una vez que lo tenemos, configuramos una regla como en el caso anterior, pero esta ver seleccionando Hash File e introduciendo el Hash que acabamos de obtener.

Figura 16: Hash File Rule creada

Una vez tenemos la regla creada, AppLocker se encargará de comprobar ese hash en cualquier ejecutable que se intente lanzar, y si coincide con el de la regla, bloqueará el binario y no permitirá su ejecución, tal y como se puede ver en la imagen siguiente.

Figura 17:AppLocker bloquea procexp64.exe

Por supuesto, si llevas años en la industria de la detección de malware, ya sabes que hacer reglas para malware basado en Hashes siempre fue una mala idea, y haciendo un "Morphing de Superman", es decir, cambiando cualquier byte de una cadena de caracteres podemos modificar ese Hash. Para ello basta con que abramos el binario con un editor Hexadecimal y hacer una ligera modificación en una cadena de texto, para que el programa siga siendo totalmente funcional.

Figura 18: Haciendo un "Morphing de Superman"

Los caracteres en rojo, son aquellos que hemos modificado, simplemente hemos sustituido las letras que se visualizaban en la parte derecha por puntos. Guardamos como un nuevo binario llamado "procexp64_unlocked.exe" pero no porque con otro nombre lo vaya a ejecutar, si no para la prueba, podéis renombrarlo con el mismo nombre del binario para comprobar que realmente es efectivo. Una vez terminado el proceso del "Morphing de Superman", comprobamos que el Hash de los dos binarios es diferente :

Figura 19: Ya no tienen el mismo hash

Por supuesto, si ahora ejecutamos el nuevo binario - con diferente Hash - vemos que realmente nos hemos saltado la restricción por Hash de AppLocker porque, evidentemente, esta ya no le aplica para nada al tenerlo cambiado.

Figura 20: Process Explorer se ejecuta

Como os podéis imaginar, conocer en detalle el funcionamiento de estas tecnologías es fundamental para fortificar cualquier entorno Windows en una empresa, y entender cómo funcionan las reglas de ruta y de hash, y cuales son sus limitaciones es importante. Por supuesto, saber qué reglas están configuradas y cómo se puede saltar  AppLocker en un proyecto de auditoría que requiera tirar de técnicas de Hacking Windows es muy útil.

Figura 21: Hacking Windows: Ataques a sistemas y redes Microsoft

Te puedes encontrar AppLocker configurado en una auditoría, y si te encuentras estas reglas en las restricciones ya has visto que no es muy complicado. Sin embargo AppLocker también tiene reglas basadas en los certificados digitales con la que están firmados los ejecutables, donde un administrador concienzudo puede elegir qué fabricantes de software, qué programas y qué versiones concretas son las que se pueden utilizar o las que están prohibidas. Cuando esto es así, encontrar la forma de saltarse la restricción es más complicada. Eso sí, siempre puedes traerte tus propios programas sin firmar cuando haya listas negras...

Saludos!

Autor: Víctor Rodriguez Boyero, Security Researcher en el equipo de Ideas Locas de CDCO de Telefónica.


More info